Saturday, April 13, 2013

More Hot Stuff- Oven Fried Onion Rings


When you're watching your weight and reluctantly going through last years spring/summer clothes and come across a recipe that absolutely makes your mouth water, you either abandon your diet, cry, or stop reading immediately, right? Not so when you have a friend like Melissa Sperka who's one of the best (southern) cooking bloggers I know, not to mention a contributor to the Dash section of Parade on line. Pretty good credentials I'd say. So when she posted her "Firecracker Onion Rings" earlier in the week I was thrilled that they were baked and not fried. Properly baking anything that is normally fried is an art that I have been working on for many years and I must admit, it isn't easy. But when you get it right, you've got to share it with the world, which is what I have to do with these perfectly seasoned, crunchy, delectable onion rings. Let's make her recipe with a few minor changes that happened along the way:

Melissa's Firecracker Onion Rings
Serves 4

1 large sweet onion
1-1/2 cup low fat buttermilk
1 T Frank's Hot Sauce
1 T Sriracha Sauce
3-1/2 tsp Old Bay Seasoning divided
1/4 tsp ground black pepper
1 tsp kosher salt
2 large eggs beaten
1-1/2 cups self rising flour- I can't find find self rising flour in my regular market so with some help from the internet, I made my own- I took 1-1/2 cups AP flour, 2-1/4 tsp baking powder, 3/4 tsp salt and mixed them together and voila! self rising flour
3 cups Panko bread crumbs- again I had to make an alteration- I only had 2 cups of  Panko so I added 1 cup of yellow corn meal (it worked like a dream)
3 T canola oil

Peel your onion and slice into 1/4 inch strips and separate into rings. Set aside for a minute.


In large plastic bag mix buttermilk, both hot sauces and 1 tsp of Old Bay. Now add the onions.


Place in refrigerator for 30 minutes and turn occasionally, to be sure the onions soak up the delicious liquid on all sides.

Pre heat oven to 450 degrees and line 2 baking sheets with aluminum foil and spritz liberally with cooking spray. When onions have had their 30 minute bath drain the rings and take 1 cup of the buttermilk liquid and set aside. Discard the rest of the liquid. Place marinated onion rings in large bowl.


We're now going to now set up a dipping station of flour, egg and and panko. To the reserved buttermilk add 2 eggs and whisk.


In a separate bowl place the self rising flour and add 1 tsp Old Bay and black pepper.


And now get another bowl for the Panko/corn meal mixture. To that add 1/2 tsp Old Bay and salt. Add the canola oil and toss with your clean fingertips to combine.


First dip the rings into the seasoned flour.


It was here that I had to recharge my camera, so maybe we're all lucky there are no more step by step pictures to view for a while. Now dip floured rings into egg/buttermilk mixture and then the Panko mix. Place on prepared baking sheets. Melissa had a great tip: place some of the smaller rings inside the larger ones to get more mileage/space out of your baking pan.


Bake 15 minutes and carefully turn rings over. Bake another 12-15 minutes and serve with a dip or two (or three) of your choice. I served these with a ranch, sriracha mayo, and just plain salsa. All delish. And by the way Melissa, thank you so much for the perfect measurements. Just the right amount of flour, egg and Panko. Perfection!


Monday, April 1, 2013

Hot Stuff


I'm loving the frozen Tai Pei Potstickers I bought a few weeks ago. I've even come up with (what I think) is a pretty authentic Asian soup that features them and will satisfy your craving for hot, sour, sweet and salty. And it's a snap to make. It took me less than thirty minutes and there's nothing fancy in here- everything you need can be found in your local market if they have an international aisle. Here's the recipe, I really think you're going to like it.

Asian Chicken Broth with Pot Stickers and Veggies
Serves 4

2 14.5 oz cans low fat/low sodium chicken broth
1 14.5 oz can water
Zest of one lime
1 clove garlic grated
1 T fresh ginger grated
3 T fish sauce
2 T Splenda no calorie sweetener
2 Serrano chilis cut in rings
1/4 tsp kosher salt
Juice of one lime
3 oz mushrooms sliced
8 Tai Pei potstickers
3 oz snow peas
1 scallion sliced thin (for garnish)

Ready to cook? Let's get started. Zest your lime and grate your garlic and ginger.


In medium large soup pot add lime zest, garlic and ginger. Now pour in the broth and water and on medium hight heat on stove top, bring this liquid to a boil. Lower heat, cover and simmer on low for 10 minutes. While the broth is getting ever-so aromatic, get the rest of your veggies prepped.


Are you smelling that deliciousness yet? You should be. What you want to do now is strain the lime, garlic and ginger out of the soup, so the broth is pristine.


Pour the clear broth back into your soup pot and add the Splenda, chilis, mushrooms, fish sauce, salt and lime juice. Cook on low, covered for 7 minutes. Now add the potstickers and cook (covered) another 5 minutes. Time to add the sno peas and cook 2 minutes more. Tada! Soup is ready.


I garnished with thinly sliced scallions, but I think if you have cilantro on hand that would be great. I actually think both would work and it wouldn't be over-kill at all.


Friday, March 22, 2013

Potstickers


I had a fabulous dinner tonight, potstickers that I made on my own stove top. It all started a few weeks ago with a walk down the frozen food aisle in my grocery store. I came across a product I hadn't seen before, Tai Pei Chicken Potstickers. I have no idea what made me throw a bag of frozen dumplings into my cart because I rarely ever buy pre-made food. But I did, and am I ever happy I was possessed during that shopping spree. Look for this package and grab one, you won't believe how good they are.


They only take 8 minutes to cook. And they come with their own dipping sauce (which of course I doctored up). I took 6 dumplings out of the bag and placed them in a saucepan, added 2 T canola oil and 2/3 cups hot water.


They don't look very appetizing at first, but just wait. Cover your saucepan and cook on medium/medium low until liquid evaporates and undersides are golden brown (about 7-8 minutes). The directions on the package instruct you to cook on medium high, but that never would have worked with my energetic stove. Serve with the enclosed packaged sauce (it's basically just soy and vinegar) but if you want a bit more heat add a tsp of sriracha, a few scallions or cilantro and grated ginger. Soooo satisfying and simple.


 I was talking to a friend about these dumplings a few minutes ago and he knew about them and said I've been living under a rock for too long. He also informed me that Tai Pei makes egg rolls as well. I've got to get with it, so I'll be looking for egg rolls tomorrow.

Wednesday, March 20, 2013

Fridge and Pantry Purge


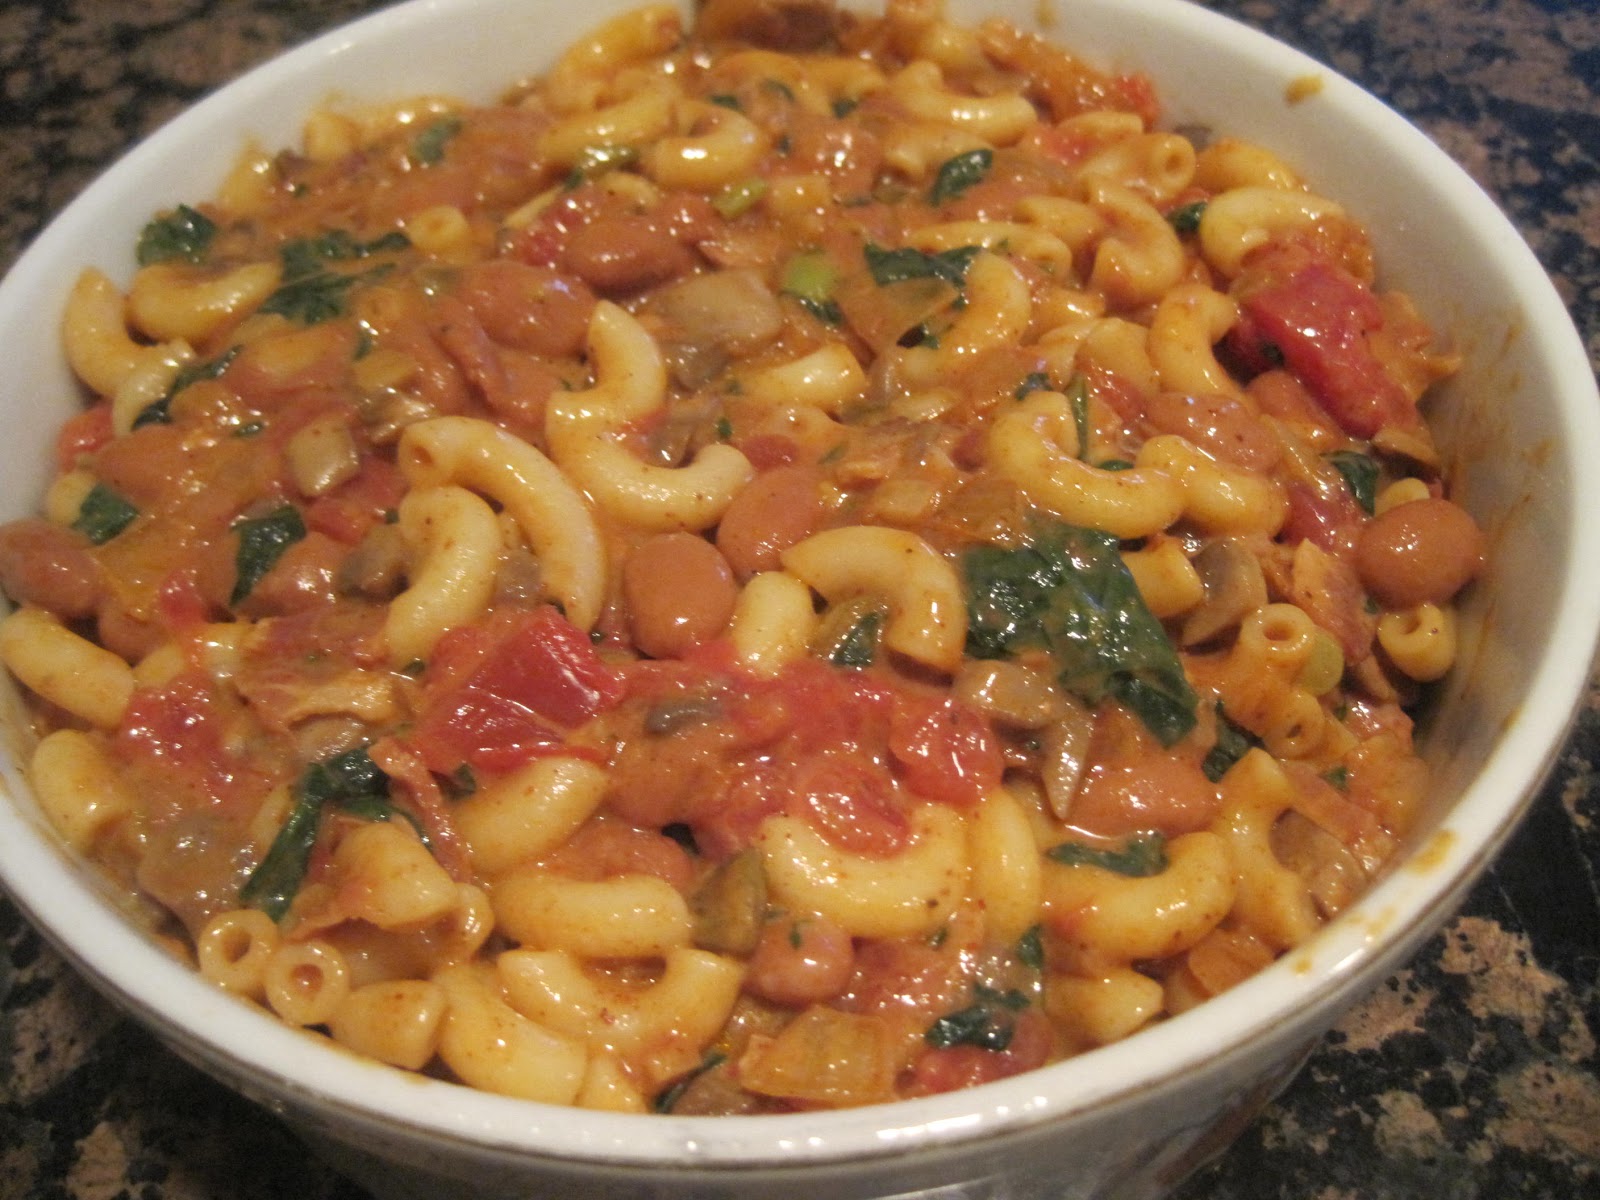
Yesterday was another messy, sleety, snowy day in New England. I drove to work with white knuckles and came home in the same condition. I had to do something to ease the tension in my body so I decided to cook. I also decided to go through my fridge and pantry and use up some of the ingredients that have been hanging around (maybe just a little too long). This post is not really a recipe, it's a method that I sometimes use that gets me to my desired result- dinner!

I had 3 pieces of bacon which I cooked up, crumbled and set aside. Then I drained most of the bacon fat from the pan and left about a tablespoon in. To the bacon fat I added 3 ounces of chopped baby spinach, 4 ounces of chopped mushrooms and 2 very sad looking scallions.


At this point I still wasn't sure where I was going with this, but after a quick look in my pantry, I decided I'd re-mix Dan and Jerry's Chili Mac, and make it Bacon Chil Mac. I cooked 1 cup of Dreamfield's elbow macaroni, opened a 16 ounce can of pinto beans and combined them with the bacon, and spinach/mushroom mixture. I was on the road to happiness.


Good thing I save my bacon fat because I then decided to saute a medium size onion, 4 cloves of minced garlic, 2 teaspoons of chili powder, 1 teaspoon of cumin, 1/2 teaspoon of ground cayenne pepper and 2 tablespoons of tomato paste in another tablespoon of that aromatic fatty bacony goodness.


I pre heated my oven to 350 degrees, opened a 10 ounce can of Rotel and looked at the unopened salsa con queso I bought on sale ages ago. So yeah, 3 tablespoons of that creaminess went into the macaroni mixture too.


I spritzed my trusty old souffle dish with cooking spray and put this delicious looking mixture in the oven (covered) for 25 minutes.


Then I added a few handfuls of low fat shredded cheddar cheese, popped the casserole back in the oven (uncovered) for 8 minutes and dinner was ready.


I toasted up some corn tortillas and sprinked the chili mac with cilanto and was a very happy camper. The weathermen/women are predicting a little more snow for tomorrow, but I've got leftovers to comfort me. And by the way, this microwaves beautifully, I had some for lunch today at work.

Friday, March 15, 2013

Crunchy Chewy Granola Bars


I've been making granola bars for years because I just can't eat the packaged ones found in the grocery store. Either they're too sweet, too crunchy, or taste like tree bark. And as much as I try to be a nature lover, tree bark is not something I'd like to ingest.

A few months ago I bought a baking pan with square indentations, and last night when I was mixing up the batter for some peanut butter raisin granola bars, the light went off in my head- Use the new pan for the bars, you'll get 4 sides of crunchy crust and a chewy middle in each and every bar.


Peanut Butter Raisin Granola Bars
Makes 8 individual 2-1/2 inch square bars

Cooking spray
1/2 stick butter
2 egg whites
1/2 cup creamy peanut butter
1/3 cup Splenda no calorie sweetener
1/4 cup honey
2 cups old fashioned oats
1 tsp ground cinnamon
1/2 cup raisins

Pre heat oven to 350 degrees. Prep pan with cooking spray. Melt butter and set aside to cool. In large mixing bowl beat egg whites until frothy. Mix in peanut butter, sugar and honey. Here's a nice tip: spray your measuring cups with cooking spray before adding peanut butter and honey and they won't stick, they'll slide right out. Now add the butter and mix. You'll have a very smooth mixture at this point. Now it's time to add the oats and cinnamon. Sometimes I add the oats whole. But last night I took 3/4 cup of oats and pulverized them in my spice grinder. I like the end result better this way, but if you're too lazy to do this, go ahead and add the oats without the grinding step. Now add the raisins.


If you're using a pan like mine, you'll get 8 bars that are between 3/4 inch to 1 inch deep. Place batter into square indentations and smooth with your clean hands. You're now ready for a quick bake.


Bake 12-15 minutes in middle rack until edges begin to slightly brown. Do not overcook.


Let cool about a half hour and enjoy!


Re-Mix: There are so many variations for this recipe and I don't believe I've tried them all yet, but here are some ideas. Instead of the raisins add mini chocolate chips and a little vanilla extract. Crushed roasted peanuts are always a welcome addition, and I have even added macademia nuts and candied pineapple, which is really a treat. And even better than the Splenda sweetener, is brown sugar. Oh, and if you are a fan of dried fruit, add some dried apricots for some zing. Go through your fridge and freezer, I bet you've got ingredients for your own custom made granola bars. Just remember that cinnamon is a strong spice and it might have to be eliminated with certain combinations.

If you don't have a pan like mine, this recipe will work in an 8 x 8 inch pan, baked for 20 minutes. I would cut the bars into 12 pieces (4 x 3) not quite square.

Monday, March 11, 2013

Tortilla and Egg Bake


I was doing a bit of experimenting last night. I love to cook ahead and then reheat because it just makes my life so much easier. And I was curious if eggs baked in tortilla shells would stand up to the reheating process of nuking at the office. I have a large muffin pan that contains 6 muffin holes that measure 4 inches in diameter that I used to use for mini quiches. I pulled this rarely used dinosaur out of the cupbaord and got to work. I had 4 six inch corn tortillas on hand, warmed them a few seconds in the microwave and nestled them inside four of the round indentations that were misted lightly with cooking spray.


They seemed to fit okay, so I proceded to sautee a few veggies in canola oil that I thought would go well with the tortillas and eggs. I used 1/2 a red pepper chopped, 1 small onion chopped, 1 jalapeno pepper chopped, 1/4 cup or so of black beans and some spices: salt, pepper, and 1/4 tsp each of cumin and chili powder.


I added this aromatic mixture to the bottom of the tortillas, and topped each with about a tsp of store bought salsa. So far so good. At this point I pre heated the oven to 425 degrees.


How could I make any Tex-Mex dish without adding cheese? Had to do it, so I added as much shredded sharp cheddar as I could fit in, still leaving room for the eggs.


I added a splash of half and half, some salt and pepper and topped each tortilla with a few extra black beans and baked them for 12 minutes which seemed to be the perfect time. The eggs were still soft, the tortillas were crispy and the insides were hot. After they cooled a bit I wrapped them up, put them in the fridge excited for the morning experiment.


I did not bring my camera to work so I do not have a picture of the re-heated, microwaved egg tortilla, and I must say, for once- one of my experiments actually worked on the first try. The tortilla stayed crisp, the egg was still soft and the inside veggies were warm and delicious. If I weren't eating this on the run at work I would have garnished with sour cream, a little more salsa, more cheese of course and cilantro leaves. Give this a try and get even more creative than I was. The possibilities are endless.

Sunday, March 10, 2013

Didi's Pastichio


It's always great when you try a new recipe from an exotic country like Greece. It's even better when when you've got a real live cooking muse that's actually from that country and she takes the time to make a video to show you how to do everything correctly. My friend Didi has been sharing many of her homeland recipes and this one said to me, "Make me. Make me. Make me NOW!" And so I did. Didi's original recipe is on her blog, Dishin With Didi and it's informative and fun to watch. I actually followed her advice almost to a tee, until I got to the bechemel. I'm sure, no I'm positive hers is authentic and more decadent, but with me still fighting a virus, it was getting too late for me to be whisking and stirring, so I took an easier route that might work for some. Last night it worked for me, like a charm. Also, Didi has a big family and I don't, so I cut her recipe in half. I ended up with 6 huge wedges of pastichio that are going to be enjoyed by me (and maybe a friend or two if I feel like sharing) all week. Ready to get in on the action? Let's go!

Didi's Pastichio
serves 6

Sauce
1 lb ground beef
1 16 oz can of crushed tomatoes
1 large/medium onion
1 tsp tomato paste- use it from the tube, it's very cost effective in recipes like these
1/2 tsp ground cinnamon- the cinnamon I have is from Saigon and is very strong. If you have something a little lighter, add another 1/4 tsp
1/2 tsp kosher salt
1/2 tsp black pepper

Faux Bechamel
Here is where I veered off the Didi track and took a page from the South Beach Diet Book. For the real thing, see what Ms Dilaba has to offer.
1/2 cup fat free half and half
2 large eggs
1/4 cup grated Romano cheese
1/8 tsp ground nutmeg
Salt and pepper if desired

Pasta
1/2 pound penne pasta- by now you know I use Dreamfields low carb, and it worked out great. Didi used long macaroni that I couldn't find in my market
1/2 cup grated Romano cheese

Topping
1 T grated Romano cheese

In large sauce pan add enough water to cook the penne. When water boils, add salt and then pasta. Stir and cook the penne for about 8 minutes. So while this is cooking, let's get started on the meat sauce. In large sauce pan add ground beef and onions and cook until beef is browned and onions softened.


Add the crushed tomatoes, tomato paste and cinnamon.


Combine, cover and simmer (low) for 20 minutes. Let's get back to the penne. After eight minutes, drain the pasta and run under cool water. At this point I was supposed to sprinkle them with the cheese. Oops, I forgot, so I did my sprinkling after each layer was placed in the baking dish.

Spray an 8 inch by 8 inch glass baking dish with cooking spray and begin layering your penne in one direction into the bottom.


Sprinkle with cheese.


I ended up getting 3 layers of penne and cheese. Now add the aromatic beef mixture directly over the noodles. I saved a bit of the sauce because I knew I'd be reheating this during the week and wanted a little somethin, somethin in case the dish needed more moisture. At this point your're ready to make the faux bechemel sauce and pre heat your oven to 350 degrees. I would love to have shown you a picture of the tasty sauce atop the noodles, but I was seriously in cooking mode and forgot to take one.

On to the Faux Bechemel. In medium size bowl whisk together all the ingredients and when well combined, pour over the top of your Pastichio.


Add remainder of cheese (or a little more if you're feeling decadent). Bake uncovered in 350 degree oven for 45 minutes. Remove and let rest for about 15-20 minutes. Cut into large squares, top with more cheese if desired and enjoy!


Thanks Didi, you really rocked it this time. Not only a delicious meal, but a work of art as well. Love ya!