Showing posts with label brown sugar. Show all posts

Thursday, June 23, 2016

Indoor Cowgirl Supper


What's your favorite thing to chow down when you're hungry, and I mean really hungry? Mine is comfort food, and this little concoction is just that- it's loaded with meat, spiced veggies and beans. This is certainly not a Florida dish, but lately the heat and humidity in these parts has got me exercising daily in a therapy current pool, which is not only great exercise and a daily dose of vitamin D, but a great excuse to make a manly meal that works great for dinner, lunch or snack (and it reheats like a dream). This cowgirl supper is simple and no fuss, and you don't have to be on the open range to make it. But it does take some time in the oven, so let's put this together so we can relax while it cooks.

Cowgirl Franks and Beans
serves 4-6

1/2 pound ground sirloin
1-1/2 T taco seasoning (I use the Publix brand these days, it's just as good as the national brands and a lot less expensive)
2 jumbo beef franks (6 oz) sliced 1/8-1/4 inch
1 can (28 oz) Bush's Original Baked Beans
1/2 large onion chopped/diced 1/4 inch
1/2 green pepper chopped/diced 1/4 inch
1/4 cup ketchup
1 T Dijon mustard
2 T brown sugar
2 T hot sauce (I like Frank's Original for this recipe)
4-5 slices bacon

Spray an 8" x 8" pan with non stick spray and set aside. Pre heat oven to 375 degrees.

On medium heat on stovetop, brown ground meat. When meat is beginning to turn color, add the taco seasoning and continue to cook until meat is brown. Set aside and continue with the rest of the steps.

In large mixing bowl combine your chopped onions and peppers, ketchup, mustard, sugar, and hot sauce.


Now add the beans and frankfurters and stir to combine. Pour this beany goodness into prepared baking pan. So far so good, and doesn't that look yummy? We're almost done with the prep.


Top casserole with crumbled, seasoned beef. Then top with bacon.


I'm liking the looks of this for sure. Cover with foil and leave one corner of the dish open/vented to allow steam to escape. Bake 1 hour. Remove foil, cook another 45 minutes uncovered and get ready to serve a filling, heartwarming meal fit for any indoor wannabe cowgirl.


Serve this with some Texas toast and a green salad. You'll feel like you're at home on the range. Happy Trails!

Thursday, February 5, 2015

Cream-Filled Oatmeal Walnut Raisin Cookies with a Twist


The twist. Ahh the twist is the addition of Maple Extract. I don't bake with it often enough, and it's the perfect addition to so many fall and winter dishes (both sweet and savory).


I know some people are not fond of maple anything, and then some go wild over maple everything. Both my parents were fanatics about maple walnut ice cream and maple walnut coffee cake. So that was my inspiration when I decided to put this experiment together last night. There are a few steps to making these little darlings, but the results are so worth it. And as usual, I've tried to cut some calories and sugar. There might be some future tweaking, but for now...this is a yummy cookie your maple lovers will adore.

Cream-Filled Oatmeal Walnut Raisin Cookies
makes approximately 20-22 sandwich cookies

Filling
8 oz Neufchatel cheese softened
1/2 cup unsalted butter softened (1 stick)
1/2-3/4 cups confectioners sugar
1 T Splenda Brown Sugar Blend (or 2 T regular brown sugar)
1 tsp natural maple extract
1/3 cup finely chopped or ground walnuts

Cookies
1 cup unsalted butter softened (2 sticks)
1 cup Splenda No Calorie Sweetener (same amount if you're using granulated sugar)
1/2 cup Splenda Brown Sugar Blend (or 1 cup regular brown sugar)
2 large eggs at room temp
1/2 tsp pure vanilla extract
1/2 tsp natural maple extract
1 tsp salt
1-1/2 cups flour
1 tsp baking powder
1 tsp baking soda
1cup rolled oats
1 cup raisins
1/2 cup finely chopped or ground walnuts

I like to make my filling first. In medium size bowl, combine your butter and Neufchatel. I use a hand mixer. Now add your sugars and maple extract.


And fold in your ground nuts.


Wrap filling in plastic wrap and set aside in your refrigerator to set up and let the flavors meld.

Let's make the cookies. Pre heat your oven to 350 and line baking sheets with parchment. In medium size bowl, combine salt, flour, baking soda, and baking powder. Whisk with a fork or spoon to incorporate. No need for any sifting. Set aside.


On to the batter. Place butter and sugars in a large bowl. With hand mixer combine sugars and butter until smooth. Add eggs and both extracts and incorporate.

 
Now add the flour mixture in two batches to the wet ingredients and combine. And fold in the oats, raisins and chopped walnuts.


I usually just plop my oatmeal dough by teaspoonfuls onto the parchment paper, but since I was filling these little beauties, I decided to make them into 1 inch to 1-1/2 inch balls, so they would all be pretty uniform in size.


Bake each cookie sheet 9 minutes. Let cool on cooling rack and remove cookies to paper towels to finish setting up. And amazingly enough, the cookies are all pretty much the same size. I lucked out on that one.


While cookies are cooling, remove the filling from the fridge, let it come to almost room temp so filling the cookies will be a snap. Lovingly pile a teaspoon to a tablespoon of the maple infused filling on to the bottom (flat side) of one cookie and top with a second. Keep going, and be sure to sample at least one (or two). They really are yummy.

Friday, December 5, 2014

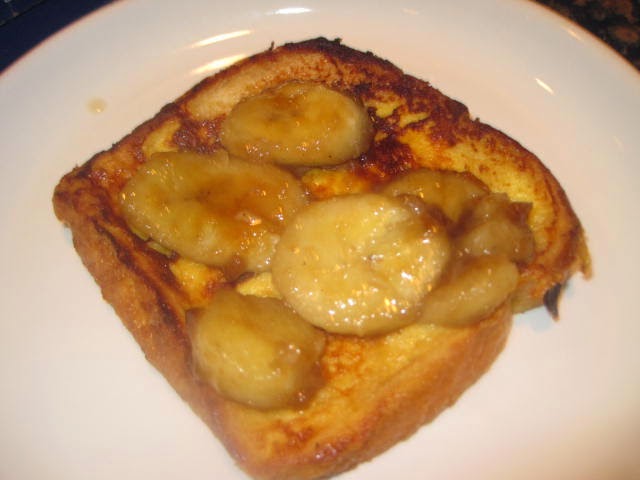
Egg Nog and Bananas Foster French Toast

 
My fabulous cooking friend Kim has been posting "25 Days of Egg Nog Recipes" and she inspired me last night. Oh did she inspire me!!! I fed myself a decadent dinner and packed up the leftovers for friends at work today.  Who doesn't like French toast? And who doesn't want to jazz up this simple dish every once in a while? Well, the bananas in my fruit basket were calling my name and the egg nog was already in my fridge anticipating Kim's suggestions. I'm happy to share this simple, yet decadent recipe. Oh, and it's a one dish meal, how nice is that?
 
Bananas Foster French Toast
Serves 3
 
Ingredients
Toast:
6 slices firm white bread
3 large eggs whisked
1 cup eggnog
1 tsp vanilla extract
Pinch of kosher salt
 
Banana Syrup/Sauce:
3 bananas sliced 1/4 inch
1/3 cup brown sugar
4 T unsalted butter
3-4 T water
 
Additional:
Butter and Canola Oil for sautéing the toast
 
Ready for some simple instructions and mediocre pictures?
 
Combine eggs, egg nog, vanilla extract and salt. Whisk together until you have a smooth custard. Soak each piece of bread in the mixture.
 
 
I didn't let them get too soggy, and placed each piece of bread on a tray until I was ready to fry them. In large sauté pan, add some butter and canola oil and heat on medium low. I did not measure the amount, but you know me, I was pretty careful not to over do it. Now add your egg-noggy soaked bread and cook a few minutes until slightly brown on each side. I was able to cook 3 at a time.
 
 
Remove cooked bread from pan and set aside. Now it's time to cook the bananas. In same pan that you cooked the toast, add the butter and brown sugar and cook until they are combined. Now add the sliced bananas and let them caramelize in the sugary mix. I wanted to stretch the sauce, so I added some water which seemed to work fine for me.
 
I did a double decker plate for myself. I took one slice of toast and topped it with the bananas.
 
 
Then I added another slice of toast and topped it with more bananas. Of course I topped the whole shebang with powdered sugar.
 
 
How can you make this even better? Add a few slices of bacon. That would do it for me. Or a shot or two of whiskey or rum to the banana sauce. I love being decadent during the holiday season!


Tuesday, November 11, 2014

Thai Inspired Red Curry Satay Chicken Soup


I can't get enough of the Thai flavors. The red chilis, lemongrass, peanuts and coconut milk to name a few. You name it- I'm hooked. Last night's dinner was simple to make and fabulous to slurp. And served with Jasmine rice, well it was over the top delish. Want to make this? I can't wait to re-live putting this simple dish together. And don't let the long ingredient list stop you from making this. It's mostly a "can opener" experience and very little prep. Let's get going.

Red Curry Satay Chicken Soup
Serves 4

1-1/2 to 2 pounds bone-in chicken breast or breasts with skin removed
Kosher salt
1 T canola oil
1 small onion diced
2 T Thai red curry paste (I use Thai Kitchen)
2 cloves garlic chopped
1 can (14 oz) lite unsweetened coconut milk
1-1/2 cups water or chicken broth (I used water)
1-1/2 T fish sauce
2 T brown sugar
1/2 cup Thai Kitchen Peanut Satay Sauce (easy to find in international aisle of your market)
1-1/2 T chili garlic sauce
1 red pepper sliced
1/2 cup frozen peas
1/2 cup frozen corn
Juice of one lemon or lime (I used a lemon, no lime in the fridge)
chopped dry roated peanuts for garnish
scallion slices for garnish
Fresno chilis sliced for garnish

Clean and wash your chicken breasts. I had a breast in my package that was soooo big, I ended up just using the one. It was about 1-3/4 pounds. Remove skin, sprinkle with kosher salt and set aside.

In large soup pot on stovetop, add canola oil and heat on medium to low heat. Add onions and sweat for about 3-4 minutes. Now add your chopped garlic and red curry paste.


Let aromatics cook for a few more minutes on low until you can smell the chili and lemongrass in the paste. It's now time to add the coconut milk, water, fish sauce, brown sugar, peanut satay sauce, and chili garlic sauce. Stir together with a spatula to combine and add your chicken breast(s).

Well, I had a nice photo array of the chicken cooking, veggies being added and it seems that my photos are no longer compatible with my blog. So, trooper that I am, I'm finishing the post without anymore new pics. Grrrrrrrrr. That's directed at you Google.

Anyway, cook chicken on low, covered, until done. Don't over cook it. My whopper breast cooked for 36 minutes on low/simmer and rested for about 10-15 minutes until I could handle it and shred it.

While chicken is resting, slice your red pepper in strips, prepare your garnishes and make your Jasmine rice in a separate pan. I'm not a great rice cooker so I use the Success brand Jasmine rice. Ready in 9 minutes.

Add shredded chicken to soup, add sliced red pepper and let them cook together 10-15 minutes. Now add the peas and corn. Cook about another minute and add the juice of one lemon or lime. When plating, I put a dome of rice in the center of each bowl and added the soup around the edges. You see, sometimes I just enjoy a mouthful of rice with very little broth and sometimes I like it nicely mixed. This way you can do both. Garnish with scallions, Serano chilis and crushed roasted peanuts. Cilantro would be a natural, but there was none available in my market. I hope you enjoy this. I had a taste tonight before writing and it's just as good if not better than yesterday. And look at that fabulous color. A very happy meal I must say!

Sunday, August 31, 2014

Baked Beans with a Little Extra Heat

Jenny's Baked Beans have been a favorite of mine for the last few years. Today I did a quick re-mix and subbed Sriracha for Franks Hot Sauce and used Dijon mustard instead of the yellow. It's hot, but not too hot, so don't let the sriracha scare you. To me, it was just perfect, and the recipe is super simple!

Monday, March 31, 2014

Pina Colada Cream Filled Cookies

 
Every year I celebrate my friend Jonathan's birthday with a new cookie. This year I did a take off on my Raspberry Cloud Cakes that I made at the 2013 World Food Championships in Las Vegas. Since Jon will be spending some time soon in the Caribbean I thought a coconut and pineapple combo would be appropriate. I didn't take any pictures to guide us through the baking process, but it's simple and I think when you make these you'll be as pleased as I was.
 
Pina Colada Cream Filled Cookies
 
Filling
8 oz neufchatel cheese at room temp
1/2 cup unsalted butter at room temp
1/4 cup sweetened coconut ground in spice grinder or food processor
1/4 cup confectioners sugar
1 tsp coconut extract
 
Dough
3/4 cup butter softened
3/4 cup Splenda Brown Sugar Blend- if you choose to use regular brown sugar double the amount
2 large eggs at room temp
1 tsp pure vanilla extract
2 cups AP flour
1/2 tsp baking powder
1/2 tsp baking soda
1/2 tsp salt
1/2 cup candied/dried pineapple rings chopped
Confectioners sugar for dusting
 
Garnish
Chopped candied/dried pineapple rings
Cream cheese coconut mixture
 
I always make the filling first: In medium size bowl combine your neufchatel cheese and butter. Now add your ground coconut, confectioners sugar and coconut extract. I cover this with plastic wrap and let it sit in the fridge while I'm making the cookie dough.
 
To make the cookies: Pre heat oven to 350 degrees and line baking sheets with parchment paper and set aside. In medium size bowl combine flour, baking soda, baking powder and salt. Stir with a whisk or fork to combine and set aside.
 
In large bowl, with hand or stand mixer combine butter and brown sugar and mix until smooth and airy (about 3 minutes). Add eggs and vanilla and continue to mix. Add half the dry ingredients into the wet and mix on low. Add the rest of the flour mixture and mix until smooth. Fold in the candied/dried pineapple pieces. Cover with plastic wrap, and let cool in your refrigerator 20-30 minutes.
 
When dough is chilled, form into small balls about 1 inch in diameter. Place on baking sheets and cook 11 minutes. Cool slightly on cooling rack, then remove to kitchen or paper towels to cool completely.
 
Remove coconut filling from fridge and take a tablespoon (or maybe a little more) and place this creamy mixture on the flat side of the cooled cookie. Cover with a second cookie to make a sandwich. Keep going until you've matched up all the mates.
 
Sprinkle the top of all cookies with confectioners sugar, add a dab of coconut cream cheese on top and plunk in a piece or two of chopped pineapple. Nice presentation and a very sweet cookie.
 
I refrigerate these cookies and take them out about 30 minutes to one hour before serving. Happy Birthday Jonathan! Oh my, what am I going to make you next year?    

Saturday, November 23, 2013

Fein Meatballs in a very Fein Barbecue Sauce


Lori is coming for Thanksgiving and I am thrilled. This is the first time in maybe 7 or 8 years that I haven't spent this holiday with her in California. I love the trip out west, love the weather, her friends and the get togethers we always plan. But it sure is nice to just to be home and relax and have company for a change. Lori eats a bit like I do. Salads, nibbles, cheese and crackers and I thought before we dug into the big Thanksgiving meal I'd make a few treats for us to enjoy with a few glasses of wine while we either watch some silly tv or get down to a few serious games of scrabble. Myia and Evan, we will be missing you when it comes to the scrabble. So tonight I decided to create a perfect hors d'oerves that can be reheated with no problem and figured I'd serve it at some point early in the week.

I met a lovely man at the WFC named Adam Feinberg who was cooking there and also sells his own BBQ spice rubs and this mench was nice enough to give me a packet of his original BBQ rub. Living in a small condo, almost like an apartment I don't do much grilling. But I stuck my finger in his rub and tasted it. Yowwwsa. It was yummy. So I decided I'd make a sweet and sour barbecue sauce with his rub. Adam, all I can say is the blend of spices is perfect. This is my first recipe using your Fein Tasting Foods.


Here's my recipe for Sweet and Sour Barbecue Infused Meatballs. They are much better than fine (or fein), they are awesome!

Chicken Meatballs with BBQ Sauce
makes sixteen meatballs

To make the meatballs:
1 pound of ground chicken
1-1/2 tsp Feiny's Original BBQ Rub
1 large egg
1/2 cup seasoned bread crumbs
1/4 cup water (you can use milk if your like)
1 T red pepper flakes
1 T dried minced onions
1/2 tsp salt
1/4 tsp freshly ground pepper

To make the sauce:
2 lemons juiced
1/2 tsp vinegar
2 T Splenda Brown Sugar Blend
3 T Feiny's Original BBQ Rub
1 15 oz can tomato sauce
pinch of salt
1 15 oz can of water

Ready to put this together? It's so simple.  Pre heat oven to 350 degrees. In medium size bowl combine egg, bread crumbs, water, crushed red pepper flakes, minced onions, salt and pepper. I mix everything together except the meat to make sure the meat gets as little mixing action as possible. I like my meatballs tender.


Now add your ground chicken and combine. I use my clean hands. Form 16 meatballs and place on baking sheet prepared with cooking spray. Hint: ground chicken can be very sticky, so I wet my hands every so often to make sure my meatballs are smooth and round.


You'll want to bake them for 25 minutes. While the meatballs are cooking prepare your sauce. In medium to large pot on stove top, combine lemon juice, vinegar, Splenda Brown Sugar Blend, Feiny's BBQ Rub, tomato sauce, salt and water. Bring to a simmer. By the time this decadent sauce is coming to a boil, your meatball are ready to go into their quick BBQ spa.


Cook the meatballs in the sweet and sour tomato bath for about 10 minutes, only to let them soak up some of the flavors the Fein mixture is exuding. Remove the meatballs to a separate plate and
reduce sauce to about half (10 to 15 minutes). Plate and enjoy.


 And enjoy some more.


They're going fast . I've now snuck a third meatball (shush) just to make sure they're as delicious as I think they are. Third one down the hatch. They are goooood.  Thanks Adam, I hope to be creating more easy recipes from your hard work. Adam's website is:  www.feintastingfoods.com.

Friday, November 15, 2013

World Food Championships 2013, Part 1


This is a view of the Freemont Experience where the World Food Championships took place last week. It looks pretty tame in this picture but when the home cooks and bonafied chefs were competing, it was a hot-bed of excitement. And the aromas were heavenly. Each night when the awards were presented, I could barely get close enough to the stage to snap a picture. But I did get a good one, the Pasta Recipe top ten finals. Six of my buddies are up on the stage. You rock ladies! And you're all home cooks, how great is that?


Unfortunately I didn't make the top ten, but since I ranked 16 in desserts I'm feeling like "I almost made it". One of the most disappointing things about not making the top ten is that I didn't get to make my yummy Calypso Cakes with Pineapple Coconut Coulis. We had about two weeks to plan and think about our final build, and I must admit I spent a lot of time and energy coming up with this concoction. I decided to make individual cakes to cut down on cooking time (they really put us to the test when it came to delivering our dishes on time). Seventeen minutes in the oven, and a few extra steps to make them competition worthy. Here's the recipe. It has a lot of steps, but is really pretty simple. If you know me, you know I don't make anything that is difficult.

Calypso Cake with Coconut Pineapple Coulis
makes 12 2 inch servings in square, flat muffin tins

For the cake
1 cup Splenda no sugar sweetener
2 cups AP flour
2 large eggs
2 tsp baking soda
1/2 tsp salt
2 tsp pure vanilla extract
1 20 oz can Dole Crushed pineapple drained (save liquid for coulis)
1/2 cup ground sweetened coconut
1-1/4 cup Thai coconut milk from 13.5 oz can (reserve the rest for coulis)

For the frosting
8 oz neufchatel cheese room temperature
1/2 cup unsalted butter room temperature
1/4 cup ground sweetened coconut
1/4 cup confectioner's sugar
1 tsp coconut extract

For the coulis
Reserved sauce from can of crushed pineapple
Reserverd coconut milk
1 T cornstarch
3 T Splenda Brown Sugar Blend
1/4 tsp salt

Garnish
1 cup sweetened coconut
1 can Dole Pineapple Slices drained and patted dry

To make the cake: Pre heat oven to 350 degrees. Prepare baking pan with cooking spray and set aside. In large bowl combine dry ingredients and whisk with a fork. Add remaining ingredients and mix by hand until combined. Pour into prepared pan and bake 17-19 minutes. Set aside to cool. Remove from baking pan to further cool.


To make the frosting: Mix cheese and butter until airy. Now add the ground coconut (I grind my coconut in my small spice grinder) and the coconut extract and combine until smooth. Now add your confectioner's sugar. Set aside in a cool place.

To make the sauce: In small pan combine Splenda Brown Sugar Blend and salt and heat on low. In a small mixing bowl whisk reserved pineapple juice, reserved coconut milk and cornstarch. Pour into warmed sugar mixture, increase heat, then simmer uncovered until it reduces by half. Set aside to cool.


Garnish: Place coconut on parchment lined cookie sheet and toast in 350 degree oven for about 5-7 minutes, checking and tossing every few minutes, you don't want burnt coconut.


Fire up your indoor grill and sear pineapple slices until they are browned on both sides. Remove from grill and when they are cooled, cut into 1/2 inch pieces.

Assembly: Top cakes with the creamy frosting. Pour a little sauce over frosted cake and make a little puddle of sauce on your plates. Place cake on top of sauce puddle, sprinkle top with toasted coconut and add a few slices of grilled pineapple. Doesn't this look yummy?


At the WFC we have to present tasting portions for the judges, and while I was thinking of how to plate this entry, Pier One Imports was having a promotion on their "tasting" wares. I opted for the Asian soup spoons (75 cents each-good deal right?). Love the way this looks.


As you can see, a lot of work went into this dessert that never got to be made at the WFC. But I will be making these little Calypso Cakes often and I hope you'll give them a try too. I know, a lot of steps- but sooo worth it. Congrats to all the competitors, we are surely a talented group of crazies.

Sunday, July 28, 2013

Sweet and Sour


In case you're wondering, the heading of this post has everything to do with the pot roast I cooked on my stovetop last night and does not refer to my mood swings. At least once a year I make Rae Fox's sweet and sour sauce and decided it was time to mix a little of her old world genius with an inexpensive cut of meat and see what happened. The result was a fantabulous, fall-apart pot roast that took on all the flavors I was looking for- tangy, sweet, sour, oniony all in a mild tomato base. It almost reminded me of Joan Nathan's grandmother's brisket, but I think (I know) it was better. It's time consuming, but certainly not difficult to prepare. Check this out!

Sweet and Sour Pot Roast
serves about 6

The Roast:
2-1/4 pound bottom round roast
2 T flour
1-1/2 tsp kosher salt
1/2 tsp crushed black pepper
2 T canola oil

The Sauce:
2 lemons juiced
1/2 tsp vinegar
1/2 cup brown sugar
1 15 oz can tomato sauce
1 15 oz can of water
1/2 tsp ground black pepper (omit if you're serving children or those with mild pallettes)
1large onion sliced

Pat all moisture from your roast- paper towels work just fine for me. In shallow plate combine flour, salt, and black pepper. Dredge meat on all sides in flour mixture and set aside.


We're going to make our sweet and sour sauce now and it's so simple, there's no cooking involved. Combine all ingredients in a large bowl or measuring cup and whisk ingredients to make sure the sugar has dissolved.


Set this mixture aside and let's get back to the beef.  On stovetop in large skillet heat your oil on medium and sear meat on all sides. You want to create a nice crust that will keep the meat moist and seal the juices in.


 Now add your sliced onions and sauce.


Bring mixture to a slight boil, cover and lower heat to the lowest your stovetop can handle and cook 3 hours. I had the time to hang around the kitchen so I turned my roast over every 30-45 minutes. I'm not sure you have to do that. After 3 hours you will discover that the meat is tender, and begging you to take a taste. Please do that, just don't burn your fingers!


So how do you serve this you might be wondering? A side of mashed potatoes would be great. Egg noodles even better- anything to soak up the delicious sauce. But I took a different route and made deli sandwiches that were out of this world. I shredded (or pulled) the meat apart and served some serious comfort food. Messy, drip down your arms potato rolls stuffed with sweet and sour pot roast with and without cole slaw.


If you were wondering, my mouth was definately big enough to wrap around these little darlings and they were gone in no time. And I was wondering, if anyone has any other food additions that would work on this tasty sammie. If so let me know, I've got some left overs and would love to give your ideas a try!

Monday, April 29, 2013

Savory, Sweet and Sassy


I'm having too much fun cooking, thank goodness it's legal. I keep reading recipes from my internet friends that go on my list of "to do's" and lately I've become enchanted (well maybe obsessed- you know how I get) with the savory and sweet combo. About a week ago I made sriracha and brown sugar bacon which was to die for, really!! I will post that little wowser another time, but tonight I want to share this weekend's sweet/savory successes. And I have to thank Helene for her Authentic Deli Mac, and Carol for sharing her Individual Meat Loaves with Sassy Sauce. Both to die for, and both super easy and quick. Let's get started with the meatloaf.

Carol's Individual Meat Loaves in Jumbo Muffin Cups
The beauty of this recipe is that it's quicker than cooking a whole meatloaf and it's portion controlled. The other beauty is the sassy sauce that acompanies it. Oh my, the combination of flavors will just about knock you off your feet. And did I say it's easy? Oh yeah, I did.

Meatloaf
Makes 4 servings

3/4 cup bread crumbs
1/3 cup fat free half and half (milk was in the original recipe)
1 large egg
1 jalapeno pepper chopped small
1 tsp Worstershire sauce
2 T dehydrated mince onion
salt and pepper
1 pound hamburger (I used the leanest I could find)
2 mozzarella sticks sliced into 12 pieces

Sauce
1/4 cup water
1/2 cup ketchup
3 T yellow mustard
1/4 tsp salt
1-1/2 T Brown Sugar Splenda Blend (or 3 T brown sugar)

I started by making my own bread crumbs in my spice mill.


In large bowl combine all ingredients except the meat and cheese.


Now add the meat and combine. And pre heat your oven to 350 degrees.


Divide your meat mixture into 4 portions and spritz your muffin tin with cooking spray and get ready to stuff these gigunda meat balls with the cheese chunks. I first thought 2 per loaf would work, but came to the realization I could sneak another one in there. The more cheese the better, agreed?


Close the meat mixture up and place in prepared muffin tin.


Set the meat loaves aside while you make the yummy sauce. This will be quick. In medium size bowl combine all ingredients.


Now spoon some of this deliciousness over your mini meat loaves and bake in oven for 30 minutes.


While these are cooking, warm extra sauce on your stove top on low. You're going to want to pour a little more on top of these babies when they are done. Doesn't this look good?


Let's make the macaroni now. Simple, simple. And the perfect accompaniment to this meatloaf.

Helene's Authentic Deli Mac
This is a (no longer) secret family recipe from a New York deli, sure to bring on the old taste bud memories

1/2 pound elbow macaroni (I used Dreamfield's low carb)
1/2 cup rice wine vinegar (Helene uses white vinegar, I didn't have any)
1/2 cup Splenda no calorie (regular sugar works of course)
1/2 cup finely chopped bell pepper
1/2 T celery salt (I didn't have any so left it out, cant wait to get some for the next time I make this)
1-1/2 gobs of low fat mayo (Helene's terminology, it works)

Cook macaroni according to package directions. Drain and rinse with cold water. Heat vinegar and sugar on stove top until sugar dissolves. Pour vinegar/sugar mixture over cooked macaroni and stir to coat. Cover and refrigerate for about a half hour to let the sweet/savory flavor combo sink in. Now add the rest of the ingredients and toss. Don't you want to dive in? I did.


Yes I did. I dove in a few times before I made this beautiful little plate for myself.


Simply fabulous ladies. As always, thanks for your help in the kitchen.