Showing posts with label confectioner's sugar. Show all posts

Thursday, June 4, 2015

A Berry Good Baked Pancake


Some of you may have seen the King Arthur baked pancake post on face book the other day. This is the link I saw. Blueberry pancakes cooked in the oven. Brilliant!! But does it work? I'm happy to say in capital letters, "YES, YES it does". Great for breakfast, brunch, dinner or anytime. I had 12 ounces of fresh raspberries and thought I'd go for it. I think this recipe should feed 6 people, but after my two helpings I snuck in a third one. So plan on a meal for 4, just saying... So simple and ready in a half hour.

King Arthur Inspired Baked Raspberry Pancakes
Serves 4

1 T unsalted butter for greasing a 9" x 13" pan (I used a glass dish)
2 cups Bisquick original pancake/baking mix (any pancake mix will do, or from scratch)
2 eggs
1 cup milk (I used 2%)
12 oz fresh raspberries divided

1/2 cup confectioner's sugar
1 tsp maple extract
Approximately 1/4 cup milk
dash of salt

Pre heat oven to 350 degrees. Grease your pan with butter. Set aside and make your pancake batter according to package directions. Add in 6 ounces of the fresh raspberries and pour into baking dish. Place on middle rack in oven. Set timer for 35 minutes.


While the pancakes are cooking make the glaze. With whisk, combine the confectioner's sugar, maple extract and 1/4 cup of milk (or even less, depending how thick you like your glaze). Set aside and wait for pancakes to come out of the oven.


When pancakes are done (test them as you would a cake, with a toothpick) set aside and let cool a bit. When warm and not too hot anymore, brush with at least half the glaze. Slice into 12 squares, garnish with the additional berries and drizzle on some more of that decadent glaze.


Since this was a test recipe for me, I pretty much followed King Arthur's directions to the letter. I'm thinking next time a little orange or lemon zest would be a happy addition to the batter. And call me crazy, but even some mini chocolate chips in the batter would work nicely, with a small little squirt of chocolate sauce on the side. Thanks King Arthur, I'm a happy gal tonight.

Friday, December 5, 2014

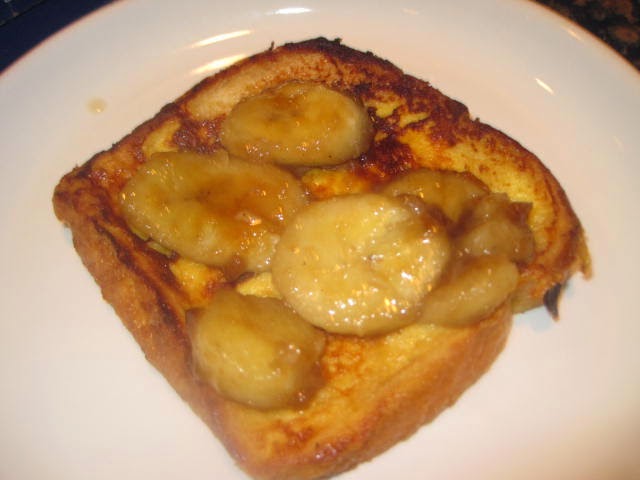
Egg Nog and Bananas Foster French Toast

 
My fabulous cooking friend Kim has been posting "25 Days of Egg Nog Recipes" and she inspired me last night. Oh did she inspire me!!! I fed myself a decadent dinner and packed up the leftovers for friends at work today.  Who doesn't like French toast? And who doesn't want to jazz up this simple dish every once in a while? Well, the bananas in my fruit basket were calling my name and the egg nog was already in my fridge anticipating Kim's suggestions. I'm happy to share this simple, yet decadent recipe. Oh, and it's a one dish meal, how nice is that?
 
Bananas Foster French Toast
Serves 3
 
Ingredients
Toast:
6 slices firm white bread
3 large eggs whisked
1 cup eggnog
1 tsp vanilla extract
Pinch of kosher salt
 
Banana Syrup/Sauce:
3 bananas sliced 1/4 inch
1/3 cup brown sugar
4 T unsalted butter
3-4 T water
 
Additional:
Butter and Canola Oil for sautéing the toast
 
Ready for some simple instructions and mediocre pictures?
 
Combine eggs, egg nog, vanilla extract and salt. Whisk together until you have a smooth custard. Soak each piece of bread in the mixture.
 
 
I didn't let them get too soggy, and placed each piece of bread on a tray until I was ready to fry them. In large sauté pan, add some butter and canola oil and heat on medium low. I did not measure the amount, but you know me, I was pretty careful not to over do it. Now add your egg-noggy soaked bread and cook a few minutes until slightly brown on each side. I was able to cook 3 at a time.
 
 
Remove cooked bread from pan and set aside. Now it's time to cook the bananas. In same pan that you cooked the toast, add the butter and brown sugar and cook until they are combined. Now add the sliced bananas and let them caramelize in the sugary mix. I wanted to stretch the sauce, so I added some water which seemed to work fine for me.
 
I did a double decker plate for myself. I took one slice of toast and topped it with the bananas.
 
 
Then I added another slice of toast and topped it with more bananas. Of course I topped the whole shebang with powdered sugar.
 
 
How can you make this even better? Add a few slices of bacon. That would do it for me. Or a shot or two of whiskey or rum to the banana sauce. I love being decadent during the holiday season!


Thursday, May 15, 2014

Decadent Orange Ricotta Cake


I had quite a bit of oranges left from my Saucy Mama challenge last week and had a serious sweet tooth to boot. I remembered the ricotta cheese in my fridge and before I knew it, I was prepping my loaf pan for a variation of Mike's Lemon Ricotta Pound Cake. It's creamy. Oh so creamy! And for those who think the consistency of ricotta is grainy, you won't find that in this sweet little confection. It's a cake that almost reminds me of a flan. It's simple to put together and I think you'll enjoy making it and eating it- especially with the orange/sugar glaze that seeps into the cake and the strawberry/orange sauce that just puts it a little over the edge. Plus there's no waste when it comes to the oranges- you'll use the zest, flesh and juice. Enough talk, let's get cooking.

Orange Ricotta Cake
9 x 5 inch loaf pan

1-1/2 cups flour
2-1/2 tsp baking powder
1 tsp salt
3/4 cups unsalted butter at room temp
1-1/2 cups ricotta cheese (I used the lower fat)
1-1/2 cups sugar (I used Splenda no calorie)
3 large eggs at room temp
Zest of 1 orange
1 tsp pure vanilla extract
Dash of orange extract (optional)

Glaze
1/2 cup confectioner's sugar
Juice of orange that you used for the zest

Orange Strawberry Sauce
16 oz strawberries diced
Zest of 2 oranges
Supremed orange slices from the 2 oranges
Juice of both oranges
1/4 cup water
1 T sugar or Splenda

Prepare loaf pan with cooking spray and pre heat your oven to 350 degrees. In medium size bowl combine the flour, baking powder and salt. Mix ingredients with whisk or fork and set aside.

In large bowl cream your softened butter. I do not have a stand mixer and find that my small hand mixer works fine. Add your sugar (or Splenda) in a few batches and beat until creamy and light. Now add the ricotta and combine to the mix. Add 1 egg at a time until all 3 have been incorporated. Now add the zest, and extracts.


When all the yummy wet ingredients are mixed well add the dry ingredients. I do this in two steps. And like most cakes, don't over beat. Combine until all ingredients are incorporated and there is no dry flour hanging around. Remember to scrape down the sides of your bowl a few times while mixing.  Pour batter into prepared loaf pan and bake 15 minutes. Lower oven heat to 325 degrees and turn loaf pan 180 degrees. Bake another 45 minutes and your cake should be ready. Use the toothpick trick- if a toothpick inserted into the cooked cake comes out clean, you're cake is done. And don't throw away that toothpick because we'll be poking some mini holes in the cake. But first, let cake cool on cooling rack.


Remove from pan and continue to cool on rack. While cake is cooling, make your glaze by whisking together the confectioner's sugar and juice of zested orange.

When the cake is easy to handle, transfer to plate and poke as many holes with your toothpick as you like. These holes are going to allow the sweet glaze to seep into the cake to make it even richer and creamier than you ever imagined.


With holes adequately poked, take a spoon and drizzle the glaze over the top of the cake. Let some of it sink in and repeat. And repeat and repeat until all the glaze is used up.


I let my cake sit overnight carefully wrapped in plastic wrap with toothpicks standing guard on all sides.


As soon as I got home from work tonight I added the final touch, the orange strawberry sauce. Now this is easy. Take your diced strawberries, supremed oranges, sugar (or Splenda), water, zest and orange juice and place in a saucepan on medium heat and bring to a boil.


Lower heat and simmer until mixture concentrates and begins to thicken, about 15-20 minutes. Stir this sauce occasionally as the sugar likes to try and stick to the pan.


Let the sauce cool and plate your dessert and sauce.


The addition of a dab of whipped cream would have been nice on top of the sauce, but darn it again, I didn't have any cream in the fridge. When I make this little bit of decadence again, you can be sure I will have some on hand.

Monday, April 28, 2014

French Toast with Strawberry Syrup


I don't think I've made French Toast in at least 20 or maybe even 30 years. My friend Lynn was talking about it on facebook today and I jumped on that bandwagon and pleased myself like you wouldn't believe. If you ever have a night where you can't decide what to cook, this is a direction you should explore. So easy and quick. Oh, and inexpensive. Get ready, you'll be eating in 20 minutes.

Strawberry Syrup/Sauce
Enough for 4 slices of French toast

8-10 oz fresh strawberries sliced
1/4 cup water
1 T Splenda or sugar
1/2 lemon squeezed

French Toast
4 slices

3 large eggs
1 tsp vanilla extract
Pinch of salt
2 tsp half and half
4 slices sturdy white bread
2 T butter
1-2 T canola oil

Powdered sugar for garnish

Slice your strawberries. Put them in a saucepan with water and Splenda (or sugar). Bring to a low boil and cook for 10 to 15 minutes. Add the lemon juice right before you remove it from the stovetop.


While strawberry syrup is cooking, prepare the batter for your toast. Combine eggs, salt, vanilla and half and half.  Soak bread for a few minutes until it becomes a bit egg-laden and heavy.


The bread I used tonight was Pepperidge Farm Farmhouse Hearty White. It's sturdy enough to hold up to the egg soaking procedure. Heat a large skillet and add butter and canola. On medium to low heat add your bread and cook about 3 minutes on each side until toasy and brown.


Plate and serve with a dusting of powdered sugar and your quick homemade strawberry syrup. Yummy, economical and oh so comforting.

Monday, March 31, 2014

Pina Colada Cream Filled Cookies

 
Every year I celebrate my friend Jonathan's birthday with a new cookie. This year I did a take off on my Raspberry Cloud Cakes that I made at the 2013 World Food Championships in Las Vegas. Since Jon will be spending some time soon in the Caribbean I thought a coconut and pineapple combo would be appropriate. I didn't take any pictures to guide us through the baking process, but it's simple and I think when you make these you'll be as pleased as I was.
 
Pina Colada Cream Filled Cookies
 
Filling
8 oz neufchatel cheese at room temp
1/2 cup unsalted butter at room temp
1/4 cup sweetened coconut ground in spice grinder or food processor
1/4 cup confectioners sugar
1 tsp coconut extract
 
Dough
3/4 cup butter softened
3/4 cup Splenda Brown Sugar Blend- if you choose to use regular brown sugar double the amount
2 large eggs at room temp
1 tsp pure vanilla extract
2 cups AP flour
1/2 tsp baking powder
1/2 tsp baking soda
1/2 tsp salt
1/2 cup candied/dried pineapple rings chopped
Confectioners sugar for dusting
 
Garnish
Chopped candied/dried pineapple rings
Cream cheese coconut mixture
 
I always make the filling first: In medium size bowl combine your neufchatel cheese and butter. Now add your ground coconut, confectioners sugar and coconut extract. I cover this with plastic wrap and let it sit in the fridge while I'm making the cookie dough.
 
To make the cookies: Pre heat oven to 350 degrees and line baking sheets with parchment paper and set aside. In medium size bowl combine flour, baking soda, baking powder and salt. Stir with a whisk or fork to combine and set aside.
 
In large bowl, with hand or stand mixer combine butter and brown sugar and mix until smooth and airy (about 3 minutes). Add eggs and vanilla and continue to mix. Add half the dry ingredients into the wet and mix on low. Add the rest of the flour mixture and mix until smooth. Fold in the candied/dried pineapple pieces. Cover with plastic wrap, and let cool in your refrigerator 20-30 minutes.
 
When dough is chilled, form into small balls about 1 inch in diameter. Place on baking sheets and cook 11 minutes. Cool slightly on cooling rack, then remove to kitchen or paper towels to cool completely.
 
Remove coconut filling from fridge and take a tablespoon (or maybe a little more) and place this creamy mixture on the flat side of the cooled cookie. Cover with a second cookie to make a sandwich. Keep going until you've matched up all the mates.
 
Sprinkle the top of all cookies with confectioners sugar, add a dab of coconut cream cheese on top and plunk in a piece or two of chopped pineapple. Nice presentation and a very sweet cookie.
 
I refrigerate these cookies and take them out about 30 minutes to one hour before serving. Happy Birthday Jonathan! Oh my, what am I going to make you next year?    

Wednesday, November 20, 2013

World Food Championships 2013, Part 3

 
The night before I was leaving for the WFC, packing clothes, emptying out my kitchen, getting my ingredients in order, and stressing to the max, I got an email from Lori- my sous chef extraordinaire and fabulous daughter (living 3,000 miles away from me) who reminded me she had some suprises in store. I usually don't worry about Lori because she is very down to earth. But her email included this picture.One is me and of one is her. And this was going to be part of our banner for the competitor's parade and the competition booth. I love the way she thinks. Just seeing her email made me giddy and I couldn't wait to see what she was planning, I was game for anything. Just to fill you in, this is a picture of each of us, one taken in 1959 and one in 1986. Yes, we were about the same age posing as Miss America. Well, when you're in a cooking competition as stressfull as the WFC, it sure is like a beauty contest except the best food wins. And when your favorite Miss America is cooking with you, it's home cooking at its' best!
 
On to the event: The two former pretend beauty queens got down to cooking Thursday afternoon and made Raspberry Cloud Cakes, our signature dish. To me it's everything that a dessert should be- creamy, rich, white chocolatey and fruity. This is one of my favorite recipes that I created over a year ago and just prior to the competition, I made them once a week for about 4-6 weeks. I made them in my sleep too. Here's the recipe, I think you'll enjoy.
 
White Chocolate Raspberry Cloud Cakes
makes about 36 filled cakes
 
Filling
8 oz neufchatel cheese softened to room temp
1/2 cup butter softened
3 T confectioner's sugar
1 T Splenda Brown Sugar Blend for Baking
1/3 cup Polaner All Fruit Raspberry Preserves
 
Dough
3/4 cup butter softened
3/4 cup Splenda Brown Sugar Blend
2 large eggs room temp
1 tsp pure vanilla extract
2 cups AP flour
1/2 tsp baking soda
1/2 tsp baking powder
1/4 tsp salt
1/2 cup white chocolate chips finely chopped
Confectioners sugar for dusting
 
Garnish
Fresh raspberries
mint leaves
 
Let's put this beautiful dessert together.
 
To make the filling: In medium size bowl combine all ingredients with hand mixer. Cover with plastic wrap and refrigerate while you prepare and make the dough.
 
To make the (dough): Pre heat oven to 350 degrees and line baking sheets with parchment paper and set aside. In medium size bowl combine flour, baking soda, baking powder and salt. Stir with a whisk to combine and set aside.
 
In large bowl, with hand or stand mixer combine butter and brown sugar and mix until smooth and airy (2-3 minutes). We used a hand mixer at the show. Add eggs and vanilla and continue to mix. Add half the dry ingredients into the wet and mix on low. Add the rest of the dry ingredients until dough is smooth. Now add the crushed white chocolate and stir to combine. Use your clean hands if it's easier. The white chocolate is a fabulous addition to these little darlings. Who doesn't like a little white chocolate crunch with a cakey cookie?
  

Your dough will be very sticky so you'll want to refrigerate it for about 15-20 minutes. Up tp 30-40 minutes if you have the time. Form dough into small balls about 3/4 inch in diameter. Place on parchment lined baking sheet and bake for 10 minutes and place on cooling rack to cool. After a few minutes you can place them on paper or kitchen towels to cool completely.


When mini cakes are cooled, the fun begins. Take a tablespoon of prepared raspberry cream and place on top of flat side of cake.


We're getting there. Now cover the filling with a second cookie cake to make a sandwich.


Keep going, you've got a lot more to make. When you cake sammies are assembled, sprinkle both sides of the cake with confectioner's sugar through a sieve. Add a dollop of the leftover raspberry cream to the top of these and garnish with a raspberry. Here is a picture that I took in my house before the contest. I was thrilled to be able to make these for the judges, with red wrappers, white plates and a sprinkling here and there of fresh mint (sorry no picture at the competition).

 
For those of you that want to give these a try, I have to warn you, they are growing raspberries bigger than you can imagine. Each garnish ended up being 1/3 of a raspberry. I cut the tops off, blotted them with paper towels to prevent bleeding and added them to the top raspberry swirl. Wish I had a picture of my final-hand in dish, but time was wasting and we were lucky to get these little cuties in on time.
 
 
And in case you were wondering, here is one of the two surprise signs Lori made. From what I could tell, we had the best "home cook" signs in the competition.
 
So the cook off is over and it's been over a week since I've been home. Will we do it next year? I'd like to think so and just hope we're invited back. To be able to do this for 2 years in a row and compete in a fierce competition like the WFC, I think our third time might be the charm. Fingers crossed!