Wednesday, September 29, 2010

Applicious


When I started this blog almost a year ago I was going to share my recipe for apple bread but opted for pumpkin instead because I thought the apple was too fussy for an introductory post. Apples are a fussy fruit. First of all there are so many varieties and if you're not familiar with their qualities, you never know what kind to buy. Secondly, if you're cooking with apples, more than likely they have to be peeled and sliced or chopped. Time consuming. And of course, then they oxidize and turn brown. Let's put these negatives aside and dive into a tasty apple quick bread that's very forgiving and tastes great. Set aside time for peeling, grating and clean up and you'll be very happy you put forth the effort. Plus, the re-mix offers a lot of choices.

Apple Quick Bread
Makes 2 loaves (4 1/2 x 8 inch pans, measured on the top)
Cooking spray
1 T AP flour for dusting loaf pans
1 cup AP flour
1 cup whole wheat flour
1 cup quick or old fashioned oats, ground in food processor or spice grinder
1/2 tsp salt
2 tsp baking soda
1-1/2 tsp ground cinnamon
1/2 cup canola oil
1/2 cup unsalted butter, room temp
1/2 cup Splenda Brown Sugar Blend
1 cup Splenda No Calorie Sweetner
4 large eggs, room temperature
1-1/2 tsp pure vanilla extract
3 cups peeled, grated apples (I used 3 large MacIntosh)
Juice of 1 lemon
Pre heat oven to 350 degrees. Prep 2 loaf pans with cooking spray and a light dusting of flour. In medium size bowl combine AP flour, whole wheat flour and ground oats. Add salt, baking soda and cinnamon and whisk to incorporate. Grate apples in food processor or use a hand grater and squeeze lemon over the fruit to eliminate browning. In large bowl combine canola oil, butter and both sugars. Mix for 3-5 minutes (I use a simple hand mixer). Add eggs and vanilla. Mix until mixture is smooth and luscious. Slowly add flour mixture. Don't over mix. Fold in grated apples and turn into prepared loaf pans. Bake 50 to 60 minutes until toothpick comes out clean. Let cool in pans on wire rack 15 minutes. Remove from loaf pans and continue to cool on wire rack. Slice and enjoy. This bread is great with butter and even better with cream cheese.

Re-mix and tips: If you don't have whole wheat flour or oats, use all AP flour. The recipe works fine. Granny Smith and Fuji apples are a great substitute for the Macs. And if you have any no-sugar-added applesauce in the house, toss in 1/2 cup before you mix in the dry ingredients- more flavor, more moisture. By the way, this recipe also works with 2 large eggs and 1/2 cup of egg substitute. If you like nuts, add 1 cup of your favorite (chopped). And if you're a raisin fan add a cup of those too. Apple Raisin Nut Bread is deliciously dense and hearty. You must try it toasted. And if you want to get a bit decadent, add a streusel-like topping: 1/2 cup of AP flour or ground oats, 1/2 cup Splenda No Calorie Sweetner, 4 T butter, 1 tsp ground cinnamon and 1/4 cup chopped nuts.

Friday, September 17, 2010

Thai Red Curry Stew...The Sequal

When it comes to cooking and creating in the kitchen I often develop Obsessive Compulsive Recipe Disorder. I went through that when I discovered Panko and more recently with my Red Curry Chicken Vegetable Stew. I couldn't get enough of that tasty dish which I devoured in no time, and had to have it again 2 days later. There were a few changes I decided to make and a new technique I thought I'd try on this go-round. I wanted to cut back slightly on the amount of coconut milk and cook the rice in the same pot as the stew- so this would truly be a "one pot" meal.

Being the frugal cook that I am, I hated discarding 1/2 a can of coconut milk (that's why I used 1 full cup in the last recipe) but Google informed me that I could freeze what I didn't use. How convenient. So I cut back on the milk. And then the rice element...well, I have a hard time making a properly cooked pot of brown rice (I always burn the bottom) and decided to use a bag of Success Rice and cook it directly in the broth. Success was achieved. The rice not only came out perfect, but the starch in the rice thickened the liquid/broth to perfection. And by now you've guessed I added ground cayenne pepper and changed the vegetables too. Well, snow peas and red peppers were on sale. What's a gal to do?

Thai Red Curry Chicken and Vegetable Stew #2

1 T canola oil
1 cup onion finely chopped (1/4 cup more than last time)
1 T Thai Red Curry Paste
2 cloves garlic finely chopped
1/2 -1 tsp ground cayenne pepper (I used 1 tsp)
1/2 cup lite coconut milk
1 14.5 oz can fat free chicken broth
1/2 cup water
2 T fish sauce
1 T brown sugar
1 tsp kosher salt
1/2 tsp black pepper
4 bone in chicken thighs, skinned
1 bag Success Brown Rice (I used the small size but the large would work equally as well)
2 red peppers sliced in 1/2 inch strips
1 8 oz bag of snow peas
1 8 oz package of sliced mushrooms
Juice of 1/2 lemon

Heat oil in large pot over medium low heat. Add onions and cook for 5 minutes until onions are soft and translucent. Add garlic, curry paste and cayenne pepper. Cook for one minute. Add coconut milk, broth, water, fish sauce, brown sugar, salt and black pepper. Stir to combine and bring to boil. Add chicken and reduce heat to a low simmer. Cover and cook for 35 minutes. Remove chicken to a separate plate and add the bag of Success rice. While rice is cooking (uncovered), shred chicken and set aside. Cook rice 10 minutes and remove. Add mushrooms and red pepper strips to liquid and cook 10 minutes (covered). Add the snow peas, cook 2 minutes. When snow peas are done, place chicken back in pot, add lemon juice and stir. Dinner is ready. And this is one GREAT one-pot meal.

Monday, September 13, 2010

From a cold nose to an Asian stew

It seems that summer is saying good-bye to those of us in New England. I left my bedroom windows open on Saturday night and reality hit when I awoke Sunday morning with a cold nose and a strong desire for my electric blanket. My first thought was that I needed to do some shopping for fall clothes. But then I quickly switched gears and realized it's once again time for some comfort food. I have to admit I've been getting tired of the grilled fish and salad routine and the thought of spending time in the kitchen was more enticing than looking at clothing styles I don't even like. So I perused my pantry and decided to make a variation of my mom's stewed chicken. An Asian variation. I've had this half-used jar of Thai Red Curry Paste in my fridge that became the inspiration for this stew/soup. The dish turned out milder than I expected due to the rich coconut milk, but very tasty. And with the possibilities of additional spices and different vegetables this is a versatile meal that you can adjust depending on who you're dining with. Also, I had all the ingredients at home, but they are readily available in the Asian aisle of most supermarkets, and their shelf lives are long lasting. And one more thing, this recipe is simple and quick. The only work I did was chop the garlic, open a few cans and pre-washed vegetables in bags. And did I mention this meal is delicious?


Red Curry Chicken and Vegetable Stew

1 T canola oil
3/4 cup onion finely chopped (I use the frozen already chopped-no more tears)
1 T Thai Red Curry Paste (comes in a 4 oz jar)
2 cloves garlic finely chopped
1 cup lite coconut milk (it comes in a can)
1 14.5 oz can 99% fat free chicken broth
2 T fish sauce (in the Asian aisle)
1 T brown sugar
1 tsp salt
4 bone-in chicken thighs, skin removed
1 15 oz can cut baby corn drained
1 12oz bag green beans, halved
8 oz sliced mushrooms
juice of 1/2 lemon

2 cups cooked brown rice

Heat oil in large pot over medium heat. Add onion and cook for 5 minutes until translucent and softened. Add curry paste and garlic and cook one minute. Do not let the garlic burn. Add coconut milk, chicken stock, fish sauce, sugar and salt. Bring mixture to a boil. Add the chicken, cover and reduce heat to a low simmer. Cook 30 minutes. Add vegetables and cook 10 minutes more. Turn off heat and remove chicken to a separate plate. Squeeze in the lemon juice and stir. I like to shred the chicken so I let it cool slightly and once shredded I add it back to the soup/stew. I serve this in bowls with a half cup of brown rice piled in the center. If I had cilantro I'd have sprinkled it as a garnish.

As I mentioned earlier, if you're looking for heat, you can do a lot to this recipe to fire it up since the coconut milk does tame it. I'd add 1/2 tsp of ground cayenne pepper or 1 tsp of crushed red pepper flakes when you're cooking the garlic. A teaspoon of Sambal Olek garnish on top of the rice is a nice touch too. Now let's talk about the various veggies you can use. How about sliced zucchini, sno peas, bok choy, canned bamboo shoots, canned water chestnuts or carrot rounds?

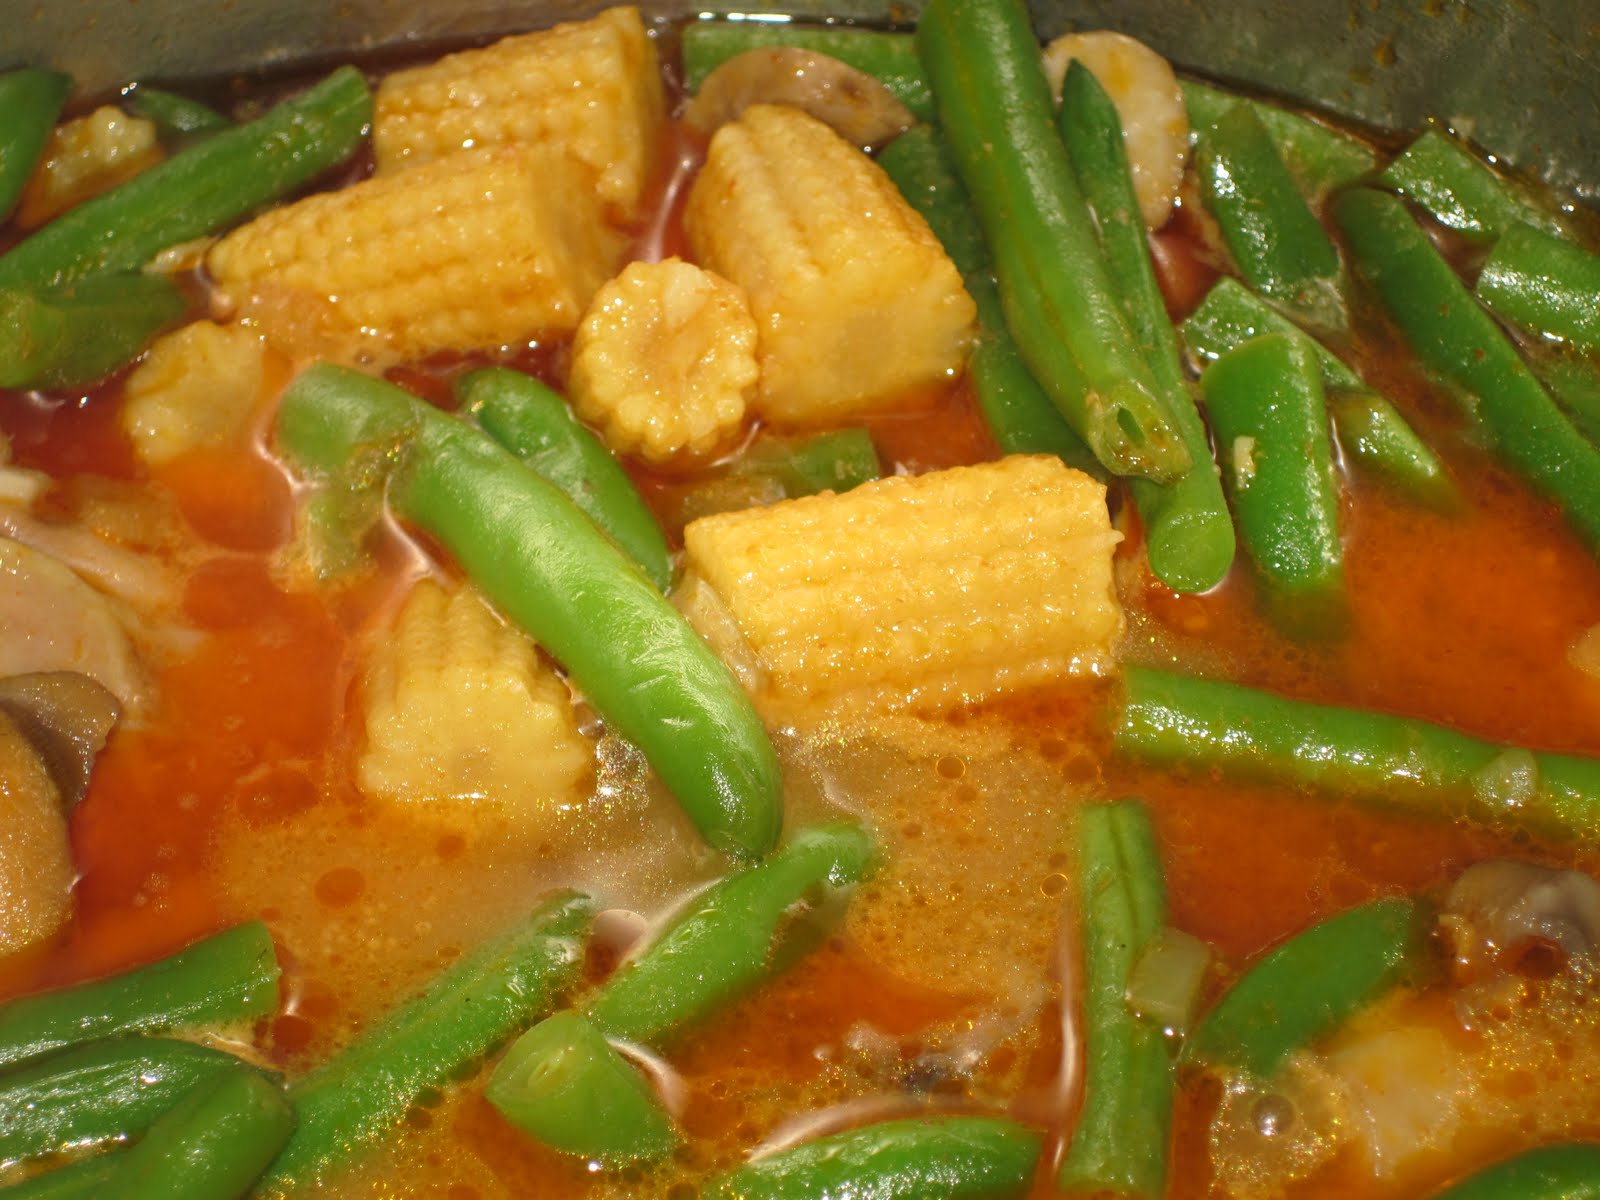
However you make this Red Curry Stew, I bet you'll see clean plates all around. Enjoy!

Sunday, August 22, 2010

California Road Trip: Food and Scenery

I just returned from another fabulous trip to Southern California. This time Lori and I began our adventure in Marina Del Rey and Santa Monica.


We then headed south to San Diego and west to Coronado Bay to enjoy the scenery and magnificent sunsets, not to mention the long awaited late afternoon and dinner reunion with 2 of my favorite cousins Peter and Jane in their fabulous (I want to live there) town of Ocean Beach.


And then we were off to Murrietta Hot Springs (slightly north and most definately east of San Diego) to the desert and valley of the SoCal wine country where we took in the surrounding mountains and experienced the pleasant, dry heat of the dessert. We enjoyed another reunion with extra-special friends we hadn't seen in over 15 years, dining outdoors at Ponte winery. We indulged in Ponte wine, great conversation, belly laughs and tears (mostly mine), fabulous food and a marvelous fine-mist spritzing devise that kept us cool in the desert heat. Heavenly. Just heavenly.


But this is a cooking blog right? So let's get down to business. I'd like to talk about the one constant I experienced at just about every meal I enjoyed- the Avocado. It first appeared in a guacamole as a garnish in some fish tacos I ate (at 2 separate times), then in a vinaigrette on my lobster and crab cobb salad and later as an olive oil infused dipping sauce for the freshly baked bread at the winery. This is some versatile fruit I'm talking about. So when I got home I pulled out my food benefits chart and checked out what this baby has to offer. So after you read the next sentence, fasten your seat belts and run right out and get yourself some of this healthy goodness. Here are the benefits: Avocados battle diabetes, lower cholesterol, help stop strokes, control blood pressure and smooth your skin. Not bad for a bumpy, alien-looking little piece of fruit!


A while ago I came up with an avocado cream cheese spread that works beautifully on toasted or grilled bruscetta. Or as a dip for chips or raw veggies and a sandwich spread (instead of mayo or mustard or ketchup).

Avocado Cream Cheese Spread
Serve on 1 loaf (1 lb) French baguette sliced and toasted

1 avocado sliced
1 tsp Dijon mjustard
Juice of one lemon
8 oz pkg Philadelphia reduced fat cream cheese softened to room temp
2 cloves garlic chopped
1/2 tsp kosher salt
1/4 tsp freshly ground black pepper

Garnish
1/4 cup fresh tomatoes small dice
1/4 cup red onion small dice or substitute 2 T fresh chives chopped

Put all ingredients (except garnish) in food processor or blender and mix until combined. Refrigerate an hour or two to let the mixture set up and the flavors meld. Meanwhile chop garnish ingredients and set aside. Top toasted bruscetta with avocado spread and garnish with 1/2 tsp of tomato mixture.


Now let's tackle the sandwich spread I mentioned a minute ago. The sandwich I love with this spread I call an ABLT: Avocado Spread, Bacon, Lettuce and Tomato. Omit the mayo you usually slather on since you're getting a lot more flavor from the avocado spread. Avocado tastes great with bacon. And tomato. And lettuce. And bread. And remember there's some cheese in this spread which also tastes great with all of the above. And if you want to really take it over the top, sprinkle on some crumbled blue cheese, which ALSO tastes great with everything on this sandwich. I can go on and on about the use of avocados and cheese, but it's late and I'm once again on east coast time. So for now, goodnight and enjoy!

Sunday, August 15, 2010

Garden Fresh


I was lucky again this weekend to get more vegetables from Fran's garden and her tomatoes are out of this world FRESH. I decided to incorporate them into an old fashioned salad that back in the day was a staple at every steakhouse in the country- The Iceberg Wedge. I used to make this type of salad many years ago before we had the availability of all the lettuces we have now. Anyway, this is a blast from the past for me and I decided a blue cheese dressing jazzed up with turkey bacon chunks might put this salad right where I wanted it- over the top.


Iceberg Wedge Salad (serves two)

1/2 Iceberg lettuce cut in half
2 medium garden fresh tomatoes sliced
2 hard boiled eggs sliced

Blue Cheese Dressing
4 slices turkey bacon
1/2 cup Lite Mayonnaise- I like Hellmann's
1/4 cup nonfat plain yogurt
1 T fresh lemon juice
1 tsp minced garlic- optional
1/2 tsp kosher salt
1/8 tsp freshly ground black pepper
3 dashes Worcestershire sauce
1/2 cup crumbled blue cheese

To make the dressing: Cook the turkey bacon. I bake mine in a 385 degree oven until crisp, about 15-20 minutes. Remove from oven and set aside to cool. When cool, chop into 1/4 to 1/2 inch pieces. Combine all ingredients except cheese and bacon in a medium-large bowl and whisk until combined. Fold in cheese and bacon and refrigerate for 1 hour to let the flavors meld.

To prepare the salad: Place lettuce wedge, tomato slices and sliced egg (plus any other vegetables you might like- scallions and carrot slices are nice) on serving dish. Spoon blue cheese dressing liberally over vegetables and dig in and enjoy the crunch.

Re-mix: My mom used to make this salad with a homemade Russian dressing and it's equally as good. She'd mix mayo, ketchup, chopped egg and sweet relish. I don't remember the proportions exactly but will be happy to figure them out if anyone is interested.

Thursday, August 12, 2010

Ratatouille

Summer produce from my friend Fran's garden is what healthy cooking is all about. Last weekend she presented me with baby eggplants, summer squash, green peppers and tomatoes and the next thing I knew I was in my kitchen making a ratatouille that's fast, easy and delicious. I didn't follow a recipe and just did what seemed to feel right. I also used a few items from my fridge. With a dish like this- any, and (almost) every combination seems to work. So have fun- and change, omit and add ingredients any way you like.


Garden Ratatouille

2 T canola oil
1 cup chopped onion
1 cup chopped green pepper
3 cloves garlic chopped
1/2 tsp kosher salt
1/8 tsp freshly ground black pepper
1 tsp crushed red pepper
2 baby eggplants peeled and cut into 1" dice
1 8 oz package sliced mushrooms
1 summer squash cut into 1" dice
1 zucchini cut into 1" dice
2 plum tomatoes chopped
1 jar 14 oz Classico tomatoe sauce
1 jar 14 oz of water
2 small bay leaves
additional salt and pepper if necessary

Heat oil in large saucepan on medium/medium low. Add onions and green pepper and sweat them for about 5 to 10 minutes. Add garlic, salt, pepper and red pepper flakes and cook for a minute. Add eggplant, mushrooms, summer squash, zucchini and plum tomatoes. When mushrooms and eggplant begin to soften add tomato sauce, water and bay leaves. Bring to a simmer and cook 25 minutes uncovered. This will allow some of the water to evaporate and the flavors to concentrate. And that's it. You've got ratatouille!

I didn't measure the quantity this recipe makes, but it is substantial. So I decided to make a pasta cheese bake with some of it.


Baked Ratatouille, Penne and Cheese

1-1/2 cups penne pasta uncooked (I use low carb Dreamfields)
3 cups of ratatouille mixture
1 cup reduced fat shredded Italian 4 cheese blend (I used Sargento- I love all their cheeses)
1/4 cup grated parmesan cheese

Pre heat oven to 350 degrees. Cook penne according to package directions. Coat an 8 x 8 inch baking dish with cooking spray. In large bowl combine penne, ratatouille and 4 cheese blend. Pour penne mixture into baking dish, top with parmesan cheese and bake 30 to 35 minutes. I had this for dinner with a crisp green salad and lunch the next day with a few slices of Italian bread.

And what happened to the remaining ratatouille? It's in the freezer for round two next week...


...which will be ratatouille served on crusty bruschetta. It makes a great appetizer or light lunch and can be served warm or at room temperature. One little tip here- before I top the bruschettas, I go back into the dish and chop the veggies a little smaller so nothing rolls off the small rounds of bread. Enjoy!

Friday, August 6, 2010

Baked Not Fried


It's been about a month since I wrote my last post, but I must say I haven't been slacking. It all started with my July 4th visit with Sharon and a snack we had at Faneuil Hall- a simple falafel platter with hummus, salad and pita bread. I knew I could make those delicious little balls of chick peas and spices without deep frying them, but it took many tries (a month's worth). I've always been a great believer in oven frying and this task was a challenge. I immediately got the spices right, but had some trouble with the baking time and temperature. There's a reason falafel are deep fried. The oil helps them crisp up and adds to the flavor. But I kept at it and came up with a reasonable facsimile for fried falafel that I think are pretty delish.

Baked Falafel

3 T canola oil
1 15.5 oz can chick peas drained
1/2 cup onion chopped
2 tsp garlic chopped
2 T AP flour
1 tsp coriander
1 tsp cumin
1/4 tsp ground cayenne pepper (optional)
2 T chopped parsley (optional)
1/2 tsp baking powder
1/4 tsp kosher salt
1/8 tsp pepper


Pre heat oven to 425 degrees. Pour canola oil in baking dish and place in middle rack of oven. To make the falafel mixture combine chick peas, onion, and garlic in a food processor or blender. Add remaining ingredients and whirl until combined. Shape mixture into 12 balls. By this time your oven should be pre heated and you can remove the baking dish and place the balls in the pre heated oil. Don't crowd the balls because the baking powder makes them spread. Bake 15 minutes. Turn them over and bake another 15 minutes. Serve warm.

For lunch at work I had my falafel cold with a hummus dressing and feta cheese salad.

Hummus Dressing
2 T hummus tahini (store bought)
2 garlic cloves finely chopped
Juice of one lemon
3 T light soy sauce
5 T canola oil
1 tsp crushed red pepper flakes (optional)
1 T water

And right before I began writing this post I enjoyed them warm with a cool Indian Raita on pita. Very tasty.

Raita
1 cucumber peeled, seeded and thinly sliced
3/4 cup non fat yogurt
1/4 tsp kosher salt
1/8 tsp black pepper
2 T fresh mint or parsley (optional)